
Mileage: 27,982
Today’s Maintenance:
- Disassemble and clean carburetors
- Zinc plate straps, strap screws, and cable bracket
- Zinc plated seat bolts, washers and spacers
- Replace accelerator pump
- Replace bowl gaskets
- Lubricated choke and throttle cables
- Adjusted idle mixture
- Adjusted idle speed
- Slightly repositioned master brake cylinder to be more upright
When I first got the bike it wasn’t running. The problem was clogged jets. As I didn’t have rebuild kits at the time, I just cleaned out the jets and bowls and put the bike back together.
With rebuild kits in hand I removed the carbs again. This time I separated the carbs so that I could get to all of the parts and give the carbs a more thorough inspection and cleaning.
I didn’t have replacement throttle plate screws, and wasn’t even sure the kit contained throttle-shaft seals, so I left those alone. The thottle shafts seem pretty tight fitting. The choke shafts had a fair amount of play in them, but air getting in past the choke shafts shouldn’t affect mixture.
One of the air cut-off valves was missing a very small seal. This is another part that wasn’t in the kit. However, as it turns out, the very small o-ring seal is the same diameter as the seal and washer that goes around the idle mixture screw, but much thicker. I had extra idle mixture screw seals, but they weren’t thick enough for a good seal. To get around the problem I used an idle mixture screw washer under the seal to push it up high enough that the cover would seal against it. The cut-off valves were in great shape.
Note for future reference: The air cut-off valve with the hacked seal is the one that’s accessible on the left side of the bike. If a proper seal can be obtained, it can be installed without removing anything from the bike.
The previous owner told me that the carbs had been rebuilt three years ago. That seems to be the case as I ended up not replacing anything except the bowl seals, and one of the floats which I accidentally broke. Unfortunately, the kits didn’t include new rubber plugs. As you can see in these pictures, the rubber isn’t in good condition. Those parts aren’t available from Honda, but I think there are after market parts on eBay. They should be replaced because bits could fall off and clog a jet.
 The new accelerator pump is on the bowl on the left in this picture. The new bowl seals are also in place.
 The carbs are ready to go back in the bike. Here you can see the re-plated front strap and cable bracket. While I had everything apart I gave the tops a quick polish as well. It’s too bad you can’t see much of the carbs when they’re on the bike. They look pretty good!
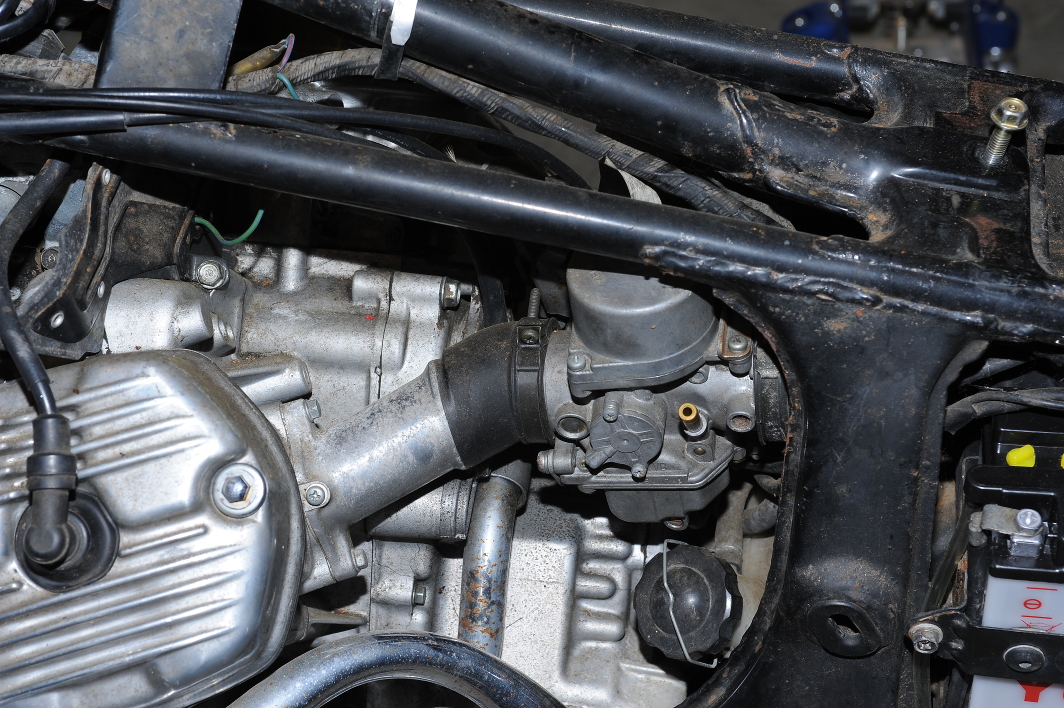
 After lubricating the cables, the throttle was still sticky. It turns out that I had routed the cables under the frame rather than over, as shown in this picture, which was taken right after I bought the bike. I removed the carbs — again — and routed the cables over the frame. Works great now. It’s psychological, I know, but with less friction in the throttle cables the bike feels quicker. Who knows, with cleaner carbs the bike might have a bit more power.
After installing the carburetors I warmed the bike up and started dialing in the mixture. I used the RPM drop method to get close and then tweaked a bit until the idle was smooth, and had good throttle response.
The bike is running really good now, at least at in-town speeds. After I borrow, or make a tool to balance the carbs, I’ll do that and re-tweak the idle mixture.
While working on the throttle cables, I decided that the master cylinder should be more upright. So I repositioned it, and added more DOT4 fluid.